Sunday, December 9, 2012

Recycled Gift Boxes Tutorial


Happy holidays everyone! 'Tis the season for craft shows. I caught a re-run of She's Crafty the other day and saw the cutest recycled "gift box" idea that I couldn't help but add my own spin to. It's a super easy and quick project that can involve almost 100% recycled materials. Check it out..

1. Gather the Supplies
How to make simple recycled gift boxes.
To start out, you'll need to collect a few paper towel rolls. She's Crafty suggests you use toilet paper rolls but, I don't know...personally I wouldn't want candy dispensed from a cardboard tube that's been stewing in a bathroom for a week. So, I chose just to use paper towel rolls and cut them to size (I also had a ton of these lying around, not as many toilet paper rolls.) Since it's the holidays, I challenge you to use a nearly spent roll of wrapping paper to make some boxes as well! Not only will the cardboard tube inside yield tons of sturdy boxes, but the remaining wrapping paper will be more than enough to cover all of them, too.

You will also need some double stick tape. I think that double stick tape is a lot better for paper crafts that would otherwise warp if they were slathered with any kind of liquid glues. However, if you're in a money crunch or can't find any double stick tape (try Wal-Mart or a craft store like Michaels) a glue stick would probably work okay.

  •  PRO TIP: Cutting paper towel rolls down to size
Use a pen and mark the rolls off so that you will get three even sized boxes. You can make then any length you want, if you even decide to cut the paper towel rolls at all. It all depends on your personal taste. However, more boxes does mean more gifts!
Just a side note- this may seem like a small detail, but it made things a lot easier when it came to cutting out these paper towel rolls. Your first reaction may be to use scissors to cut out your paper towel rolls, like mine was. But don't do it. As I quickly discovered, your cut will come out all jagged and lame. Instead, try this..

Definitely use your X-acto blade (or box cutter) to chop up your paper towel rolls. Not only will the process be faster and easier, but the cut will come out much neater.
My x-acto blade laying triumphantly beside all those cut up paper towel rolls. You go girl!
2. "Wrapping" the gift boxes


 In this tutorial, I decided to use Christmas wrapping paper to decorate my boxes. However, what type of paper you choose is completely up to you. If you want to take out the holiday look of the boxes, choose a more neutral paper. If you're really adventurous you could even try using fabric or vinyl to cover the rolls.


The amount of paper you'll need to cover your paper towel rolls can be approximate. Obviously, the idea is to have enough to completely cover the cardboard with a little bit extra for the edges. Lay your paper flat out and cut it slightly longer than the length of your boxes. Then, roll the tube up in the decorative paper to get the length you'll need to cover it completely.
 Once you get a good paper size, use it as a template to cut out more of that same shape.


At this point, you'll need to start putting double stick tape on the back of your papers. Luckily, you won't need to cover the entire paper with tape. A single strip on all four sides will hold it down good enough. Pull off the sticker backs and carefully roll the cardboard tube around your paper. The tighter and smoother you can get the paper to adhere to the roll, the better your gift boxes will look.


This awesome two sided paper is left over from some presents I got to open up early! This is a great use for all that left over wrapping paper after Christmas. Try cutting up a few pieces and using them for a gift box wrapper. Don't worry if the paper is a little crunched up...The wrinkles do not show up hardly at all once the paper is applied to the cardboard tube.
  • PRO TIP- Folding over the edges
You will most likely have some "extra" paper hanging over the edge of your cardboard tubes. You can either trim off this excess, or you can be fancy and fold the excess over the edges for a slightly more refined look. If you put your double stick tape close enough to the edges, you should be able to simply fold them neatly over the side of the paper towel roll.
3. Closing the ends

Folding the ends is quite simple. Start by flattening the paper roll somewhat, squashing it down so that there are two sides to your "box." Then, fold these edges inward towards each other and they will naturally create a concave shape as your gift box's closure.
4. Decorating your gift boxes

This is the fun part! There are tons of different ways you can go about decorating your gift boxes, depending on the occasion. On She's Crafty, they put some rubber stamp designs on the boxes so that they would each have a unique print. I decided to go slightly bolder with my embellishments.
I chose to add some cute ribbon to my gift boxes to spruce them up. I think the bows turned out to be a nice, simple finishing touch.
...But don't forget a candy cane on top! Alternatively, you could also a name tag, a gift card or any other little trinkets your loved ones would enjoy.
5. The Finished Results


These gift boxes are stuffed full of delicious chocolates. This is a fool proof present idea.. You just can't go wrong with candy!

These little guys will be perfect mini presents for all my co workers, as well as thoughtful handmade additions to the gifts I was already going to give to my friends and family this year.

And yes, you may have noticed the Christmas-y theme of these gift boxes, but I have to note that they can be made for any holiday or occasion. It all depends on what kind of paper and designs you chose to decorate them with. The sky is the limit.... try them for Valentine's day, birthdays, Easter, anniversaries, or just because. People love "just because" gifts! (Especially me.. send me a gift, too.)

With all my tutorials, I invite you to share your results if you make this project yourself. I want to hear all the juicy details.. How did your friends and family enjoy their recycled gifts? The biggest compliment is when they can't tell that you made it yourself. Happy Crafting!


Sunday, November 25, 2012

The Transitions Art Show

About a month ago I participated in another wonderful art show run by the awesome curator Phil Hyman. 

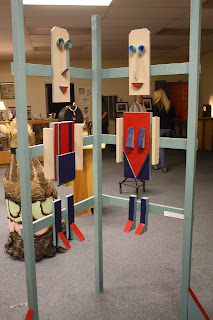
Transgendered Gay Artwork Sculpture Wood This time it was called the Transitions Art Show. They always come up with these zany but strangely appropriate names for the events. The last one I was involved with was called The Outsiders Show (and I wrote about that one, too.)  I really enjoy being a part of these things. It always brings out a variety of artists and it's completely free to submit and sell your work... a very rare find when it comes to showing your stuff in art galleries.

The piece shown to the right greeted visitors as they entered the gallery perfectly embodies the theme of the Transitions show. It was explained to me that it was a self portrait created by an individual that is currently going through gender reassignment surgery.  I love how the two genders can be distinguished by such small, thoughtful details, like the shape of the noses and the size of their feet.


colorful art steve delong
The show featured some new work by Steve DelongThe elaborate process in which he achieves the designs in his work is fascinating. From what I've gathered, apparently it involves carefully coloring copper plates with various chemicals and dyes.

jewelry art gallery Kay Hyman Rachelle Rose
A shot of some more of the work in the gallery, including this incredibly ghostly dress that was made of paper. There was also a lot of jewelry on display this time, including lovely pieces by Kay Hyman and Rachelle Rose.


rats recycled installation art tony prete
Another new and strange work from the local artist Tony Prete. This rat sculpture was installed  vertically on to the side of a wall.  I really appreciate this piece because it commanded the room's attention. It was definitely one of the first art works you noticed when entering the gallery. Not to mention that his work often utilizes recycled scrap materials, which I am also a huge fan of!
nuts barstool weld art sculpture eric dolan
Check out this wicked bar stool made by
Eric Dolan. The seat is made of welded
together lug nuts! I can't imagine how
long that must have taken.

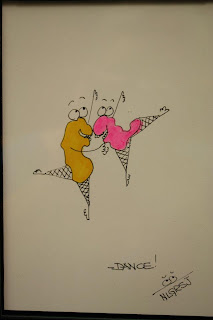
cute dancing wonka nerds art nina rego
Nina Rego's cute new series of prints.
They remind me of  Wonka Nerds!
Lamp pin up shilouette light art phil hyman
By Phil Hyman
light pin up lamp retro art phil hyman
I love artworks that are functional as well as beautiful. These pin-up girl lights by Phil Hyman embody those ideals. Can I use one of these as a night light please??


chalk art drawing gallery show designs
An interesting chalk drawing being
created outside of the gallery.
What kind of art show is it without some artists there actually creating art? Phil's daughter had the right idea... she spent hours at this desk working on a hand made purse. It turned out fabulous, by the way.


The Transitions Show also had some live performances, including many underground and experimental bands. Here's local band The Lung performing for the crowd. I appreciate the fact that these art shows celebrate all forms of art, not just visual ones.
The show's grande finale was an incredible collaborative performance by the artists James Carrier, Geoffrey Comier, Karen Inella, and the Wayand Modern Shadow Puppet Theater. Sadly, I wasn't able to make it that night due to car troubles, but I was told the show was fantastic. There was shadow puppets, belly dancing, and live medieval flute playing! Maybe I can catch their next show's performance...


Alien Light Art show Phil Hyman
And how can you say no to an alien that is
beckoning you to the gallery so friendly-like?
I write these personal experiences about art shows I've participated in because I want to encourage all my readers to participate in more community art events themselves. Local art shows like these are happening in your neighborhood all the time, you just have to look for them. They are incredibly rewarding experiences because you  meet such a variety of people and can be exposed to many different styles of art. And if you're an artist, it gives you an opportunity to show your art off to the public (and maybe even sell a few things!) I was incredibly grateful for that opportunity because it gave me some confidence in my work. Seeing the reaction of strangers to your artwork can be inspiring somehow. It's hard to explain, the only thing I can say is to go out there and try it for yourself. Support local art and it will support you!


Photographs taken by Eyeball Art Shows.

Wednesday, October 31, 2012

Happy Halloween!

This is a silly picture we took at the local haunted house on Halloween. They put on a great show! I thought their "Decapitation Station" was especially creative of them... probably was my favorite part of the whole experience. They put this crazy green screen poncho over you and some "neck bacon" as they call it. Then, with a little photoshop magic, you're now a headless ghoul! I'm the head on the left that's all whiny looking. So funny. What did you guys do for Halloween this year?

P.S Here's some more of my favorite decapitation pics from their Facebook photo album...


Thursday, September 6, 2012

Wreck this Journal part THREE!

Oh snap, my Wreck This Journal is back with a vengeance!

(Don't forget to read my Wreck this Journal posts Part One and Part Two first! Don't worry, I'll wait...)


Gosh, is it time for another update on my journal already? Surprising how time flies when you're having fun. Needless to say my WTJ has been keeping me very occupied. I have been persistently working towards my goal of completing every page. It has been a long road but I am slowly but surely inching towards completion! Lately, I've just been focusing on getting content onto all of the pages. The tasks are a lot less daunting when you aren't staring at a clean, blank white page. There are over 200 pages in the journal from cover to cover and I think I may have at least something on just about every page now. Everything's been smooth sailing so far!
Sometimes I feel like one day I'm going to pick up my book and it's just going to fall apart in my hands. Actually, that happened recently. I went to grab my book and both the front and back covers completely fell off! Alas, that meant I finally had to tape up the spine of my WTJ.  I tried to put it off for as long as I could but you simply can't use mod podge for a job that requires good ol' fashioned tape.

Oh, and my Wreck this Journal is getting so FAT! How much more stuff can I cram into these pages?  

I haven't shown the back cover of my journal before so, here it is. The "Attempted Not Known" sticker is my half ass attempt at sending my journal through the mail. At this point the book would cost close to $10 to ship (which is way more than I want to spend!) so I just put a sticker on there from another package.

The "Wreck this Journal" inside cover again.. a few things have changed. It was inspected by David.
This page got all wet and melted, so I had to redraw a bunch of stuff.

Add your own page numbers- Another that is still in progress.
I want to find some of those little house number stickers to put all over this page.
..

Leave this page blank on purpose? BOOBY BUTT TO THAT!
In a weird way I kind of liked the strange coffee smell my journal got when I did this page, but unfortunately many other strange stinks and funks have long since over powered that scent. No one told me that the Wreck This Journal would start to smell so weird...
"Draw Fat and Thin Lines" - I did all my lines with a mechanical pencil.. they leave deeper marks on the pages. Those lines look lovely going along with my gelatinous blob covered in eye balls.
Speaking of gelatinous blobs, I finally finished up "Poking Holes in This Page Using a Pencil." Eye see you...
The "add dirty finger prints" page has
really taken some abuse!
Check out those awesome embossed textures.


Color this entire page.. and then color over it again!
I dedicated a page in my Wreck this Journal
to one of the most badass (and underrated)
Batman villains of all time, Inque. I love the
dramatic range of motion this character has.


"Draw lines in motion"- I finally like this one. I went over all the lines with a dark pencil and colored in the rest of the white spaces. It totally reminds me of one of those wicked scribble doodles you'd draw in Paint now. 
Fill this page with circles.. a lot harder than it sounds. I decided to make it even harder and only use circular found objects instead of just drawing a bunch of circles. Some of my favorite "circles" include a bunch of stale rubber bands that I found at the office. Also found at the office was a bunch of these weird caulking samples of all different colors. No one ever knows what they are when they see them....awesome. Speaking of awesome, check out the two beer coasters that I hinged together with some tape. Oh and yes, there is a Ralph Steadman drawing on that coaster!


Wow this page looks crappy right now.  All the pretty flowers I glued on  have now fell off for the most part... and I still haven't worked up the guts to even "swing the book wildly" yet!
"Collect Fruit Stickers Here"

Great improvements have been made on this page. You may notice that there are more fruit stickers! My family and I are trying to eat healthier Obviously, our favorite fruit is still the banana.


Have I mentioned yet that if you put a page of the
Wreck this Journal in the wash that it completely
disintegrates?

Well, that's what I have for now, but there's still so much for me to do in my journal. I have really enjoyed documenting my experience with Wreck This Journal. As time goes by I am able to look back at my old posts and say, "WOW, How things have changed!" Make sure to stay tuned for more updates!

In the mean time, what do you think of my progress so far? Which page is your favorite? How would you suggest finishing some of my incomplete pages? Oh, and if you have your own WTJ it would be really cool to see some of your interpretations of these assignments. I can always use a little bit of inspiration. 


My Journey With Keri Smith's Wreck This Journal 
1) The Beginning.....
2) WTJ Part Two
3) WTJ Part Three - Vengeance 
4) WTJ Part Four - The Reckoning
5) WTJ Part Five - Return of the Journal (Final)