Showing posts with label holiday. Show all posts

Sunday, December 9, 2012

Recycled Gift Boxes Tutorial


Happy holidays everyone! 'Tis the season for craft shows. I caught a re-run of She's Crafty the other day and saw the cutest recycled "gift box" idea that I couldn't help but add my own spin to. It's a super easy and quick project that can involve almost 100% recycled materials. Check it out..

1. Gather the Supplies
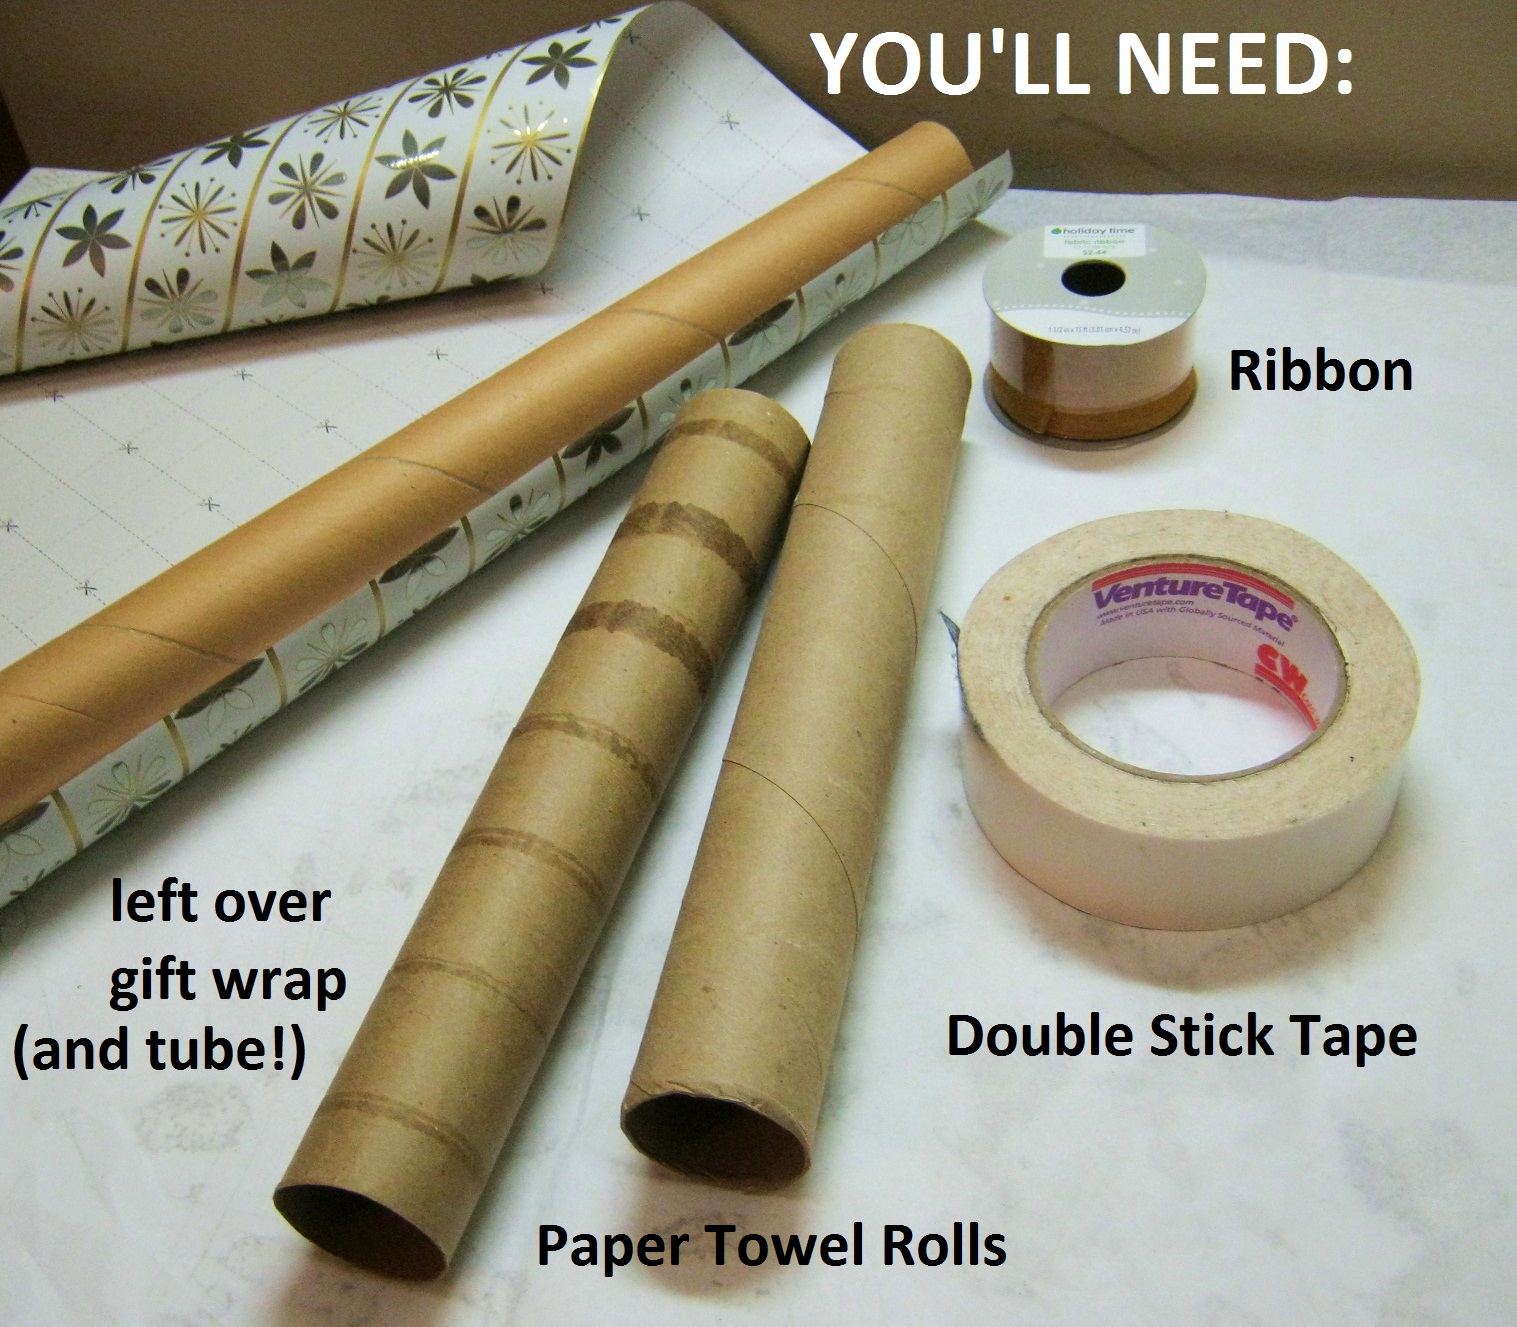
How to make simple recycled gift boxes.
To start out, you'll need to collect a few paper towel rolls. She's Crafty suggests you use toilet paper rolls but, I don't know...personally I wouldn't want candy dispensed from a cardboard tube that's been stewing in a bathroom for a week. So, I chose just to use paper towel rolls and cut them to size (I also had a ton of these lying around, not as many toilet paper rolls.) Since it's the holidays, I challenge you to use a nearly spent roll of wrapping paper to make some boxes as well! Not only will the cardboard tube inside yield tons of sturdy boxes, but the remaining wrapping paper will be more than enough to cover all of them, too.

You will also need some double stick tape. I think that double stick tape is a lot better for paper crafts that would otherwise warp if they were slathered with any kind of liquid glues. However, if you're in a money crunch or can't find any double stick tape (try Wal-Mart or a craft store like Michaels) a glue stick would probably work okay.

  •  PRO TIP: Cutting paper towel rolls down to size
Use a pen and mark the rolls off so that you will get three even sized boxes. You can make then any length you want, if you even decide to cut the paper towel rolls at all. It all depends on your personal taste. However, more boxes does mean more gifts!
Just a side note- this may seem like a small detail, but it made things a lot easier when it came to cutting out these paper towel rolls. Your first reaction may be to use scissors to cut out your paper towel rolls, like mine was. But don't do it. As I quickly discovered, your cut will come out all jagged and lame. Instead, try this..

Definitely use your X-acto blade (or box cutter) to chop up your paper towel rolls. Not only will the process be faster and easier, but the cut will come out much neater.
My x-acto blade laying triumphantly beside all those cut up paper towel rolls. You go girl!
2. "Wrapping" the gift boxes


 In this tutorial, I decided to use Christmas wrapping paper to decorate my boxes. However, what type of paper you choose is completely up to you. If you want to take out the holiday look of the boxes, choose a more neutral paper. If you're really adventurous you could even try using fabric or vinyl to cover the rolls.


The amount of paper you'll need to cover your paper towel rolls can be approximate. Obviously, the idea is to have enough to completely cover the cardboard with a little bit extra for the edges. Lay your paper flat out and cut it slightly longer than the length of your boxes. Then, roll the tube up in the decorative paper to get the length you'll need to cover it completely.
 Once you get a good paper size, use it as a template to cut out more of that same shape.


At this point, you'll need to start putting double stick tape on the back of your papers. Luckily, you won't need to cover the entire paper with tape. A single strip on all four sides will hold it down good enough. Pull off the sticker backs and carefully roll the cardboard tube around your paper. The tighter and smoother you can get the paper to adhere to the roll, the better your gift boxes will look.


This awesome two sided paper is left over from some presents I got to open up early! This is a great use for all that left over wrapping paper after Christmas. Try cutting up a few pieces and using them for a gift box wrapper. Don't worry if the paper is a little crunched up...The wrinkles do not show up hardly at all once the paper is applied to the cardboard tube.
  • PRO TIP- Folding over the edges
You will most likely have some "extra" paper hanging over the edge of your cardboard tubes. You can either trim off this excess, or you can be fancy and fold the excess over the edges for a slightly more refined look. If you put your double stick tape close enough to the edges, you should be able to simply fold them neatly over the side of the paper towel roll.
3. Closing the ends

Folding the ends is quite simple. Start by flattening the paper roll somewhat, squashing it down so that there are two sides to your "box." Then, fold these edges inward towards each other and they will naturally create a concave shape as your gift box's closure.
4. Decorating your gift boxes

This is the fun part! There are tons of different ways you can go about decorating your gift boxes, depending on the occasion. On She's Crafty, they put some rubber stamp designs on the boxes so that they would each have a unique print. I decided to go slightly bolder with my embellishments.
I chose to add some cute ribbon to my gift boxes to spruce them up. I think the bows turned out to be a nice, simple finishing touch.
...But don't forget a candy cane on top! Alternatively, you could also a name tag, a gift card or any other little trinkets your loved ones would enjoy.
5. The Finished Results


These gift boxes are stuffed full of delicious chocolates. This is a fool proof present idea.. You just can't go wrong with candy!

These little guys will be perfect mini presents for all my co workers, as well as thoughtful handmade additions to the gifts I was already going to give to my friends and family this year.

And yes, you may have noticed the Christmas-y theme of these gift boxes, but I have to note that they can be made for any holiday or occasion. It all depends on what kind of paper and designs you chose to decorate them with. The sky is the limit.... try them for Valentine's day, birthdays, Easter, anniversaries, or just because. People love "just because" gifts! (Especially me.. send me a gift, too.)

With all my tutorials, I invite you to share your results if you make this project yourself. I want to hear all the juicy details.. How did your friends and family enjoy their recycled gifts? The biggest compliment is when they can't tell that you made it yourself. Happy Crafting!


Wednesday, October 31, 2012

Happy Halloween!

This is a silly picture we took at the local haunted house on Halloween. They put on a great show! I thought their "Decapitation Station" was especially creative of them... probably was my favorite part of the whole experience. They put this crazy green screen poncho over you and some "neck bacon" as they call it. Then, with a little photoshop magic, you're now a headless ghoul! I'm the head on the left that's all whiny looking. So funny. What did you guys do for Halloween this year?

P.S Here's some more of my favorite decapitation pics from their Facebook photo album...


Wednesday, December 21, 2011

Deliciously cute cookie pops for Yule


Happy new years everyone! I'm feeling especially festive today. To celebrate the holiday seasons, I made some cute cookie pops for everyone to enjoy during my family's little yule-tide festivites. They're really simple to make, so as a little gift from me to you, I'm gonna share the recipe for these artsy treats:

 Ingredients-
  1. Cookie Dough (pre-cut squares will work the best)
  2. Vanilla frosting
  3. Popsicle sticks
  4. Food coloring
  5. Sprinkles and other edible embellishments (optional)
All you need to do is insert a popsicle stick horizontally (not sticking straight up) in the cookie dough, pointing towards the middle of the cookie. Arrange them on a pan like normal, except try to keep the cookies and sticks from touching each other. Bake the cookies by the directions of their regular recipe. While they're baking, the sticks shouldn't burn in the oven, but it's probably a good idea to check on them now and then anyways.
How to make a lollypop cookie...

 The decorating is the fun part. This is where you can be creative. All you need is some vanilla frosting and your favorite color food dye. I was lazy and just used a butter knife and a paper plate to mix and decorate my cookies. I finished them off by putting some colorful sprinkles on top. You can use just about any edible topping as an embellishment to your cookie. The options are endless.. you can use granulated sugar sprinkles, m&m's, chocolate chips, or even jelly beans. It's up for you to decide.

By the way these, were a hit at all the family get-together's this year. I think people enjoyed the creative twist on such a holiday classic. It's such a simple thing to do, there's no reason you shouldn't give it a try one day! These would be perfect for events besides Christmas. Give them out at kid's parties or as birthday presents. They'd probably sell out at bake sales if packaged nicely.

My mom helped me set up this impromptu Christmas scene featuring Santa towels and our awesome cookie pops.

If anyone tries out this idea leave me a comment! Preferably with some cute pics of the results. I just love this idea, I cant get enough of it :P

Wednesday, December 7, 2011

Makin' skeletons for the Christmas party

 So I've just been busy the past week or so whipping up a new project for the local comic shop's Christmas get-together. They always hold a massive auction of all sorts of oddities, this time including my cool skull art! I'm anxious to see how much my work will bid up to. The proceeds from some of the pieces will go towards buying my mom "The Walking Dead" comic series for Christmas. She loves the TV show and said she wanted to eventually read the real story. So hopefully, I'll make some money off of the whole thing. Here's what I'm entering:

This is what I like to call my disco skull. It's been floating around since last year's Christmas, when I made it for a charity art show ran by so called "local punk artists."  Unfortunately, they didn't appreciate my donation enough to even schedule a pick up, so consequently it was never sold. However, this year it's going off to a good home  and I'll (hopefully) never have to see it again!

It's actually a pretty interesting piece because it's purely pieced together with fabric and thread but it isn't soft or "quilty" at all; the whole thing was mounted to a tiny scrap of wooden board.

For the eyes, nose and mouth I got to use one of my favorite techniques, which is reverse applique. I discovered this method when a fellow artist introduced me to the Mola art form, done by Kuna women in Panama City.

I could never quite pull off the same intricate details that they do in a real mola, but I like to think that this piece was inspired by the style. The top fabric is cut away to reveal my shiny sequin fabric remnant (which just so happened to be the exact perfect size for this piece, go figure!)


The other item I'm putting into the auction is this cool little bag I've styled. Yes, I did use a blank tote bag instead of making my own, but I feel like I added at least some value to to it because I bedazzled the crap out of it. Well, technically, they aren't bedazzles, they're studs. Much cooler looking. 


I also had some extra big pyramid studs left over from an old belt, which are always a nice touch to an otherwise boring accessory.
The hands were done with gesso, which ensures that the print will not fade or degrade much over time. I also really like how gesso is such a strong white color. It doesn't take many layers at all to get a nice bright coat, especially against dark colors.

To bring the whole bag together (literally!) I added a closure made of ribbon, beads and elastic. I also added a little tag with my contact information and a message to the new owner:


The tag doesn't lie. This bag is going towards a genuine walking dead charity.. also don't be shy, if you're the owner of this bag leave me a comment and tell me what you think!


Of course I added a few "oldies but goodies" into the mix. Also up for sale are my fishy, mustaches and skulls keychains. I'm hoping that they'll bring in a few last minute impulse buys at the checkout aisle. Speaking of which, if you're interested in purchasing an awesome keychain for yourself, be sure to check out my craft shop! ;)


The auction is tomorrow, and I'll post my results then. I hope I make something off all my hard work! For the record, I'm starting my auctions for the disco skull and bag at $5 a piece. Wish me luck. It's gonna be a gruesome Christmas.

Thursday, October 27, 2011

Fake Blood Recipe and Halloween makeup tips!

Happy holidays everyone! It's that time of year again... that's right. HALLOWEEN.
It's my most favorite of all favorite holidays and I'm so psyched that it's finally here! I've been very busy this month with ghoulishy fun things to do, including party for my 20th birthday. More importantly the Charleston Zombie Walk was this month! I'm so thrilled to have something like this finally in my neck of South Carolina, I've been both years so far and it's a blast. If there's a local zombie walk you can go to, make sure to go out and see! It's a unique, life long memory.

In celebration of Zombie walk and bloody Halloween people everywhere, I've decided to share with you my perfect blood recipes! I was frustrated by the amount of searching I had to do in order to find these recipes. It was insane to me how quickly "how to" sites suggested you resort to using disgusting food items including applesauce, chocolate and even (gulp) ketchup. So needless to say, I'm against using gross and disgustingly sticky food items on your skin. I'm also against using the flimsy "store brand" of blood that they try to sell you. It's nearly 3 dollars an ounce, and the stuff doesn't even look slightly convincing.

The recipes I use are simple and can be made nearly anywhere. I've personally tested these concoctions and used them on other people- all of which seemed impressed by the results. I have the photos to prove it!


Blood results from Z DAY 2010 and 2011!


This artificial blood can be used for a few thoughtful accents, or for a monster hungry for copious amounts of blood. (for example, a Zombie Snookie)
So, how do you make it? 
Firstly, there are two different types of blood you'll probably need, especially if you're doing a zombie costume. There is an edible kind, and one strictly for skin. Here's all the supplies I used to achieve these effects:
I got all my zombie blood making supplies from Wal-Mart and the Dollar Tree. They're all household items, nothing fancy. Of course I got extra things, all you really need is the gelatin, corn syrup, coloring and extract.
Non-sticky blood for skin-

This blood looks amazing and dries solid while still giving the illusion of being wet (see zombie pictures above.) Once it sets on your skin, you won't have to worry about smearing it or sweating it off. It's perfect for giving dimension to your gore and wounds. Clean up for this type of blood is pretty simple, too. It flakes off evenly and is water soluble.  
This recipe has provided enough zombie blood for up to 3 or 4 people, but I always had some left over after using it. Unfortunately it doesn't keep for long (because the gelatin begins to solidify), so it always must be "made to order."
Get it in the baking aisle of a grocery store.

 All you need is:
  1. 1/2 a packet of Unflavored Gelatin
  2. Red, green and blue food dye
  3. Approximately 1/2 Water (varies)
  4. (OPTIONAL) tissue paper and corn starch

Start with a half a packet of unflavored gelatin in a cup or container. Add about the same amount of water as the amount of gelatin (just enough to mix the powder together and give it viscosity, don't drown it.)

The exact water amount will vary depending on what affect you're looking for. "Dripping" blood would contain slightly more water, and goopy gore blood would contain slightly less. I suggest gradually adding small amounts of water until you find a consistency you like.

The food coloring can be added next. Begin with adding 10-12 drops red (approximately) to your blood mixture. You won't need the entire bottle, just enough to thuroughly color your mixture. To darken up your blood, thus making it more realistic, slowly add blue and green by 1 or 2 drops at a time. For every 10 drops of red, 1 drops of each dark color will do.

After application, don't disturb the blood and it will dry within minutes.

OPTIONAL: I haven't tried this, but some recipes recommend you mix bits of tissue paper and cornstarch into your blood mixture. Apparently this should make it more chunky and textured, but like I said I don't really know for sure. If you try this let me know how it turned out!

Helpful Tips

I know it's hard, but resit using the blood until all of your facial makeup is done! It will ruin your makeup and blood if you try to put makeup over all of of your freshly applied blood. Your bloodiness will look best if it's the finishing touch to your outfit.

You can get bigger "wounds" if you work in layers. Let the artificial blood dry on your skin before you add more. It should stay mostly where you put it, and not run much at all. Give it 5 to 10 minutes to dry.

Always test your concoctions before the big day! You will have to experiment a few times before you get something you're completely pleased with.

Remember, if the blood seems too watery, wait a few moments for the gelatin to stiffen. Add more gelatin powder sparingly. If there is too much gelatin powder, not only will your blood not dry properly, but your mixture will be grainy and flaky. It may also dry too "tight" and not give as much flexibility on your skin.

Edible Corn Syrup blood

Zombie Snookie and Zombie Joker! <3
I know I said I was against sticky food blood, but this is stuff simple and necessary if you need a recipe you could actually eat. For example it went perfect with my with my Zombie Snookie outfit, enabling me to carry around a giant wineglass prop with "blood" inside it instead of wine.
It's useful for Zombies and Vampires because you can get on your teeth and mouth. Try taking a swig of it and letting it gush out your mouth dramatically for a cool effect.

I wouldn't suggest ingesting a ton of this stuff, though, because it's really thick and sticky, but it looks convincing and it gets the job done. Don't use this blood on your skin, either. It's mostly syrup, so it can get really messy and sticky fast.


Here's what you need:
  1. Light corn syrup
  2. Mint or vanilla extract
  3. Red, blue and green food dye
Add the syrup to a cup or container (like your prop glass.) Simply add in approximately 10-12 drops of red and 2 drops of blue and green. Once again, the blue and green add some darkness to your blood, making it less cartoon blood and more realistic blood.

After that, just add a flavoring extract to disguise the taste of the corn syrup. My favorite is peppermint, but vanilla extract is also popular. Most grocery stores will have these basic baking items- they're probably even all mostly on the same aisle.

OPTIONAL: I think that adding tiny amounts of water and cornstarch would make this recipe slightly less sticky. This is what I'm trying next year.

Helpful Tips

I've tasted it before, and it actually isn't as horrible as it may seem. The extract completely masks any taste of corn syrup and its strangely tasty after that.

This blood will stay liquid for a while, but you'll need to stir it every now and then to keep it fresh.

If you're taking this blood mixture with you somewhere for some reason, make sure to keep it in a well sealed container. Avoid the disaster I had last year when it got all over my camera and zombie makeup supplies.

This recipie is also actually really funny to use as "punishment" for procrastinating monsters who want to put on blood at the last minute... if they put it all over their face, they'll be sticky the rest of the night >:D

Moar Halloween makeup applying tips!

It surprised me to discover that many of my friends need serious help when it comes to Halloween makeup. It's pretty much the same as painting a canvas, except you're using really crappy materials. Even with that said, I have had a lot of success with the cheap "Wal-mart" brand cream Halloween makeup. Where I live, it's only $1 for an entire tube, and it lasts forever.
The secret to dealing with this junk is that you have to work in layers. Patience is a virtue when it comes to certain mediums in art, and this is definitely one that takes restraint!

Here's what I do to achieve decent Halloween makeup:
Me applying makeup on Charleston's Z-DAY 2010.
  1. Work light to dark- Apply the lightest color first, then put the darker ones on top of that.
  2. Don't slather it on too thick- Start with 1 layer of your color at a time. You will have to apply more than one small "coat" of the same color to achieve an even tone. If you put too much on at once, you will get a muddy look.
  3. Use shading techniques- For example, don't just use black and white if you're going for a pale look. Use an array of different colors all lightly layered on top of each other. Instead of plain black, use black, brown and green in unison. You will be surprised by the effects.
  4. Don't forget the cheek bones- For some reason if you add some dark shading to your cheek bones your makeup looks better. I don't know why.
  5. Also, don't forget the rest of your body!- Your outfit extends beyond what your face looks like. A little bit of detail on your arms, hands, and even feet will push your look to the next level.
You can also get different effects on your makeup depending on what kind of applicators you use. These are all the ones I used this year at zombie walk:

Cotton swabs, a paint brush, makeup wedges and popsicle sticks!
I will admit my favorite applicator is the makeup wedge. They were cheap (only a dollar for an entire pack at the dollar tree) and it applies the cream makeup really nice and smooth. Plus, everyone can have their own personal wedges and not have to dirty up their hands as much.

I also like the cotton balls because they can give an unusual "grainy" texture to the makeup. For zombies, it looked more like decaying flesh than a smooth white face! Q-tips can be used to get tight details and for blending.

The Popsicle sticks are used for stirring the blood recipes and heaping on big layers of the gelatin blood. They're cheap and you can throw them out when you're done!

I stumbled around and yelled "GIAHHNNI!" in my best Zombie Snookie voice.
Everyone got in on the zombie blood this year, from planners to procrastinators.

LOL I loved everyone's zombie outfits this year. Zombie bananas and LMFAO zombies.. brilliant.

Anyways, I hope my tutorials helped! As always drop me a comment if you liked this recipe, or have an even better blood concoction to suggest. I'm always looking for new ways to make blood muahaha.. Happy Halloween everyone!!