|
| I found an artistic treasure. Goose Creek Rocks! |
There is a new underground subculture of artistry going on and it's a lot easier to be a part of than you'd think. All you need are some rocks and a little bit of imagination. Just decorate the rock and hide it somewhere in public for someone else to find. Congratulations, you have now just participated in the impromptu art exhibitions that are sweeping the nation - Hidden Art Rocks of Kindness, so to speak.
A local faction of these rock artists has recently cropped up in my home town of Goose Creek. I quickly fell for the idea and went on a rock making flurry of my own. I have been completely inspired not only by all the amazing rock art but by the happy faces of the people who find the hidden rocks. There is also something giddy-inducing about hiding these rocks, like a little fairy, sprinkling magic here and there as you make someone else's day. I must say, it's addictive. Not to mention the exercise you get by walking around to either hide or find rocks. It can turn the biggest couch potato into an explorer of the world, and that's pretty great too.
However, I noticed that on the group's facebook page, there were a lot of novice rock painters that wanted to participate but didn't quite know where to start. I saw a lot of the same questions asked over and over, and while me and the rest of the group did our best to answer all those questions, it seemed impossible! So, I thought, why not just make a huge master list of all the things you could possibly ever want to know about decorating rocks? Might as well represent Goose Creek with pride and do it right. For my fellow local rockers but also for any other faction members that would like a crash course in rock decorating as well.
Without further ado, here's the master list. It's huge and I intend on continuing to grow it, so if you have any tips or thoughts to share, please feel free. In the spirit of the rock hunting communities, I want this to be a collaborative effort!
Super Master List of Everything You'd Possibly Need to know about Rock Art!
FREQUENTLY ASKED QUESTIONS
¸.•*´¨`*•.¸¸.•*´¨`*•.¸¸.•*´¨`*•.¸¸.•*´¨`*•.
 |
| Soot Monster by Trina Lyn (Goose Creek Rocks) |
ABOUT THE ROCK GROUPS:
- Who came up with this idea?- How did Goose Creek Rocks begin?
- Where do I find rocks that have been hidden?
- What are the guidelines for hiding and taking rocks?
- What should I write on the back of my rock?
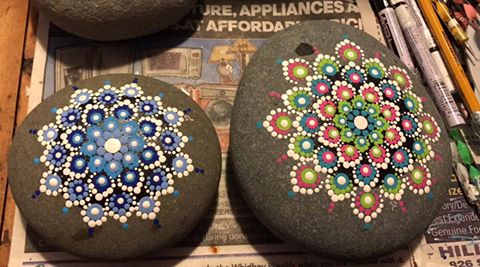
- Rock Art Inspiration ★
CREATING ROCK ART:
What kind of rocks should I use?How should I prepare my rocks for decorating?
What materials should I use on my rocks?
How do I glue three dimensional objects on my rock?
How do I seal / protect my rock art?
TROUBLESHOOTING:
- Why are hairs coming out of my paintbrushes when I paint?- What if the rocks I bought are polished? Is there any way to use them still?
- What if the rocks I bought are too rough to paint on?
GLOSSARY
¸.•*´¨`*•.¸¸.•*´¨`*•.¸¸.•*´¨`*•.¸¸.•*´¨`*•.
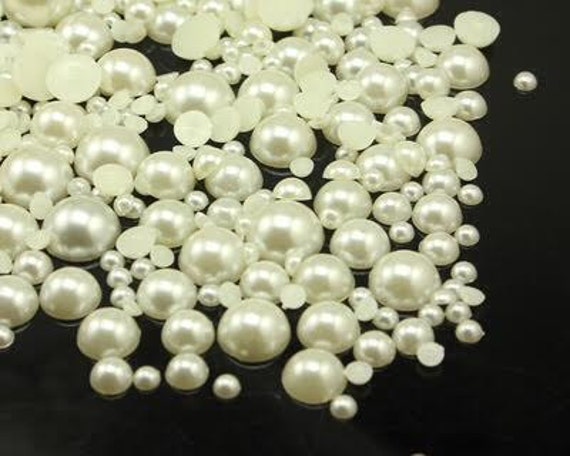
ROCKS:
- 3"- 5" Large Rain Forest River Rocks ★ Community Favorite- 1" - 3" Rain Forest Pebbles
- 1" - 2" Mexican Beach Pebbles
Polished Rocks (Why NOT to use them)
- Other rocks
TOOLS:
- Stiff Paint Brushes
- Sponge Brushes
- Sealant: Spray or Brush on
- Super Glue / E6000 / Decoden
MATERIALS:
Acrylic Paints
Sharpie Markers
Paint Pens
Stamps / Ink
Flat Backed Beads
Stickers / Paper Cut Outs
- Misc. Materials & Tools
¸.•*´¨`*•.¸¸.•*´¨`*•.¸¸.•*´¨`*•.¸¸.•*´¨`*•.
Who came up with this idea?
After doing a little bit of research, I eventually traced the rock groups back to a sleepy little town on the Olympic peninsula of Washington named Port Angeles. The movement appears to have started about a year ago when a girl named Aisha Lesh and her friends started randomly hiding their own decorated rocks around town. From there, the idea caught fire, and since then their little rock hiding group has swelled to over 5 thousand local members. Since the inception of this group, the movement has continued to spread, and there are now literally hundreds of rock hunting groups that have cropped up all over the country.
Press about Port Angeles Rocks.
Port Angeles Rocks official Facebook page.
"When Jim Morrell of Goose Creek combed a beach 2,951 miles across the country earlier this month, he wasn’t looking for seashells. He was looking for rocks, but not just any rocks: painted rocks. Whidbey Island — and a lot of other places around the country — has a vibrant rock painting community... Morrell was hooked the instant he found his first painted rock. He brought the rock and the idea of painted rocks home to Goose Creek. That was only three weeks ago. Now, there are hundreds of rocks hidden around Goose Creek and more than 500 members of the Goose Creek Rocks Facebook page. Morrell teamed up with a few friends, including Cathy Gregory and his daughter [Jerrika Morrell,] to bring the idea to the city streets. “We get a kick out of somebody finding a rock,” Gregory said. “It’s the fun of it. The thrill of it and no monetary involvement. It’s fun, family time — time spent together.”
The Goose Creek Rocks page is lovingly tended to by the Morrell family and I have to admit they're kind of like local celebrities down here for starting this group. I think Goose Creek is super thankful to them for bringing this idea back home. The group has recently celebrated it's 2000th member! Co-Founder Jerrika Morrell appropriately commemorated the event with a special rock featuring some of South Carolina's best attractions - Rainbow row, luscious palm trees and our new frikken' cool giant bridge.
By the way, it's definitely worth checking out Jim Morrell's inspiration for this group, Whidbey Island Rocks' Facebook group, too. They are by far the largest community of rock artists I've come across so far with over 17,000 members, and the work they produce is especially incredible. There is an endless amount of inspiration to beheld there.
More press about Goose Creek Rocks here.
Goose Creek Rocks official Facebook Page.
"Please be thoughtful of others and the environment when placing rocks...The city parks department has also asked that you do not hide your works of art in the grass where they may cause damage to mower blades and other equipment. This should also be considered if you are hiding rocks along trails or display garden beds. We want to be a blessing to the community not a nuisance. Also be respectful of private property and businesses. It is always a good idea to ask permission.
Found Rocks- If you find a rock please share a photo on this page...Sharing only lets the artist know that their art was found and well received. Also, please be respectful of painted rocks on private property or if there is nothing written on the back of the rock it may be part of a more permanent art/beautification display. If you find a rock with a nasty message or one that is in need of some TLC (writing needs to be touched up or resealed),considered repainting it instead of leaving it behind or before hiding it again.
Keeping and Re-hiding Rocks- If you find a rock consider giving it a new home in your home or garden. You can start to grow your own Rock Garden. Feel free to re-hide rocks wherever you think they may belong. We have had quite a few rocks travel to different states and it is exciting for the artist to see all of the places that they go. That is something to keep in mind when you are traveling. You can bring your own masterpieces or someone else’s along on your journeys and take the fun outside the community and inspire others.
Don’t Get Discouraged- Your beautiful creations are a gift and a blessing to whoever finds them. Don’t get discouraged if your really awesome beloved work of art is never shared but you know has been found...Just remember how special it is to unexpectedly find a work of art or message on a rock and the joy that it brought. You can be certain that your art has been a joyful blessing to the finder even if they didn’t share to say so." - Whidbey Island Rocks
Most people label the back of their rocks with the rock hunting group's name and the text "Keep or rehide." There are a few methods to get this message transferred on your rock. The obvious one would be to simply get a fine point sharpie or something similar and write down your message. My personal technique is to print out a ton of tiny labels on a single piece of printer paper and cut them out. I mod podge the tiny label to the back of my rock before varnishing.
By the way, if you were hoping to find the spiel to put on your rocks, I've written up a little template for you. Feel free to change it to suit your specific needs. This is just what a typical label tends to looks like, more or less:
Creating Rock Art
Bonnie Burn had some great thoughts on preparing your rocks for artwork:
"If you buy your rocks instead of using natural ones, especially the rainforest rocks, they often come covered with a thick layer of pulverized "rock dust." If the rocks are dusty, wash them off with a hose and let dry before decorating. The rock dust will clog your markers, make your paint run when sealing the rock, and if you glue beads or other findings on, it makes the glue not hold. Found all this out the hard way." - Bonnie
Depending on where you live, the best place to try is your local Home Depot, Wal-mart or K-Mart. Lowe's does not carry the right type of rock for the job, weirdly enough. If you're lucky to live somewhere like Whidbey Island, however, you might have better luck just picking up a few rocks the next time you goto the beach or out for a hike. For the rest of us, we'll probably have to order online. I discuss where to find rocks to buy in more detail here.
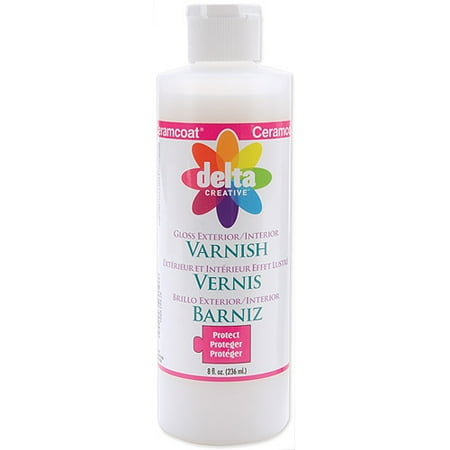
Possibly one of the most important steps of rock art decoration and often one of the most confused. Please stop using regular Mod Podge because it totally doesn't work! Let me steer you in the right direction of sealants- Spray on or Varnish.
Get yourself some better brushes. This happens when you get really cheap quality brushes or use soft brushes on a rough surface (like a rock.) You don't have to spend a lot of money on brushes, you just gotta get the right ones for the job. I discuss which brushes to choose in further detail here.
Yes, but it will take a little bit more creativity now. Read on about my thoughts on polished rocks
if you'd like more ideas on how to still use them for your rock art.
This happened to me when I got a hold of some really crumbly egg rocks. If your rocks are really textured and bumpy, they are liable to quickly tear up your art supplies. Remedy this a little bit by building up layers of paint / mod podge on the surface to make it smoother and more accepting of medium. Not only will it save your tools from destruction, it will make the paint and other supplies stay on much easier and evenly.
[Back to top]

Available online at:
Home Depot
Sam's Club
Kmart
Walmart
Amazon
A nice, darker alternative to the white Rain Forest Rocks. These would be great in combination with bright acrylic paint colors or paint pens, which would absolutely "pop" on a dark surface.
Available online at:
Sam's Club
Home Depot
Port Angeles Rocks official Facebook page.
How did Goose Creek Rocks start?
According to press about Goose Creek Rocks, the story goes a little something like this: |
| M&M Rock by Jim Morrell (Goose Creek Rocks) |
 |
| Goose Creek Rocks 2000th Member Rock by Jerrika Morrel |
The Goose Creek Rocks page is lovingly tended to by the Morrell family and I have to admit they're kind of like local celebrities down here for starting this group. I think Goose Creek is super thankful to them for bringing this idea back home. The group has recently celebrated it's 2000th member! Co-Founder Jerrika Morrell appropriately commemorated the event with a special rock featuring some of South Carolina's best attractions - Rainbow row, luscious palm trees and our new frikken' cool giant bridge.
 |
| Wolf Eye by Liam Royd (Whidbey Island Rocks) |
More press about Goose Creek Rocks here.
Goose Creek Rocks official Facebook Page.
"Another common question is where everyone hides their rocks. Most of us don't reply to that one though because we don't like for our movement, or project so to speak, to be centered around hunting the rocks. It's meant as an act of kindness more so than anything but if the artist so chooses to share their location of hiding then they're more than welcome to." - Jerrika Morrell
With that being said, some people may genuinely want to find one of these enormously special rocks to keep for themselves, and I don't blame them! So where should you look? The best places to try are near community centers, city halls, local grocery stores, gas stations, hiding in a shopping cart, underneath your door mat, hidden in a pumpkin patch. They can be anywhere, really, so consider it an excuse to be more aware of your surroundings from now on!
 |
| A tomato rock by Betsy Crump found at Shelton Vineyard, SC |
Are there any rules to hiding and taking rocks?
There is a general consensus about the common courtesy involved in participating in the rock art movement. In their group guidelines, I think Whidbey Island Rocks says it best by covering some of the most common issues that come up in rock art groups:"Please be thoughtful of others and the environment when placing rocks...The city parks department has also asked that you do not hide your works of art in the grass where they may cause damage to mower blades and other equipment. This should also be considered if you are hiding rocks along trails or display garden beds. We want to be a blessing to the community not a nuisance. Also be respectful of private property and businesses. It is always a good idea to ask permission.
Found Rocks- If you find a rock please share a photo on this page...Sharing only lets the artist know that their art was found and well received. Also, please be respectful of painted rocks on private property or if there is nothing written on the back of the rock it may be part of a more permanent art/beautification display. If you find a rock with a nasty message or one that is in need of some TLC (writing needs to be touched up or resealed),considered repainting it instead of leaving it behind or before hiding it again.
Keeping and Re-hiding Rocks- If you find a rock consider giving it a new home in your home or garden. You can start to grow your own Rock Garden. Feel free to re-hide rocks wherever you think they may belong. We have had quite a few rocks travel to different states and it is exciting for the artist to see all of the places that they go. That is something to keep in mind when you are traveling. You can bring your own masterpieces or someone else’s along on your journeys and take the fun outside the community and inspire others.
Don’t Get Discouraged- Your beautiful creations are a gift and a blessing to whoever finds them. Don’t get discouraged if your really awesome beloved work of art is never shared but you know has been found...Just remember how special it is to unexpectedly find a work of art or message on a rock and the joy that it brought. You can be certain that your art has been a joyful blessing to the finder even if they didn’t share to say so." - Whidbey Island Rocks
How do I write messages on the back of my rocks?
 |
| Printed out rock label that has been glued on. In the future I intend on making a more detailed label with the whole spiel. |
"Rather than writing the "Keep or rehide" text, I ordered a custom rubber stamp with the spiel on it. Even if you don't rubber-stamp the front of your rocks, rubber-stamping the back is a quick and easy way to put the group text on it, and the custom stamp from www.thestampmaker.com was only about ten dollars. Saves a lot of writing. .. they had a discount sale going at that time, but without the sale I think the stamp would be about $15, plus shipping." - Bonnie Burn
By the way, if you were hoping to find the spiel to put on your rocks, I've written up a little template for you. Feel free to change it to suit your specific needs. This is just what a typical label tends to looks like, more or less:
You've found a Goose Creek Rock!
KEEP OR REHIDE
Share a picture of this rock on our Facebook group:
Goose Creek Rocks
Creating Rock Art
¸.•*´¨`*•.¸¸.•*´¨`*•.¸¸.•*´¨`*•.¸¸.•*´¨`*•.
How do I prepare my Rocks for Artwork?
 |
| Stamped rock by Bonnie Burn (Goose Creek Rocks) |
Bonnie Burn had some great thoughts on preparing your rocks for artwork:
"If you buy your rocks instead of using natural ones, especially the rainforest rocks, they often come covered with a thick layer of pulverized "rock dust." If the rocks are dusty, wash them off with a hose and let dry before decorating. The rock dust will clog your markers, make your paint run when sealing the rock, and if you glue beads or other findings on, it makes the glue not hold. Found all this out the hard way." - Bonnie
Which rocks should I avoid using?
Polished rocks and rocks that have too rough of a surface should be avoided if possible. Read more about why polished rocks won't work here, and possible problems with using rough rocks here.Where do I get the rocks to paint on?
What materials should I use on my rocks?
The right rock will take a variety of different media very well, from markers, ink and paint, to unexpected materials like colored pencils, crayon and stamps. This is a great opportunity to get creative with what supplies you already might have on hand.
How do I seal / protect my rock art?
Possibly one of the most important steps of rock art decoration and often one of the most confused. Please stop using regular Mod Podge because it totally doesn't work! Let me steer you in the right direction of sealants- Spray on or Varnish.
Troubleshooting
¸.•*´¨`*•.¸¸.•*´¨`*•.¸¸.•*´¨`*•.¸¸.•*´¨`*•.
Why are hairs coming out of my paintbrushes when I paint?
Get yourself some better brushes. This happens when you get really cheap quality brushes or use soft brushes on a rough surface (like a rock.) You don't have to spend a lot of money on brushes, you just gotta get the right ones for the job. I discuss which brushes to choose in further detail here.
What if the rocks I bought are polished? Is there any way to use them still?
Yes, but it will take a little bit more creativity now. Read on about my thoughts on polished rocks
if you'd like more ideas on how to still use them for your rock art.
What if the rocks I bought are too rough to paint on?
This happened to me when I got a hold of some really crumbly egg rocks. If your rocks are really textured and bumpy, they are liable to quickly tear up your art supplies. Remedy this a little bit by building up layers of paint / mod podge on the surface to make it smoother and more accepting of medium. Not only will it save your tools from destruction, it will make the paint and other supplies stay on much easier and evenly.
[Back to top]
MATERIALS
¸.•*´¨`*•.¸¸.•*´¨`*•.¸¸.•*´¨`*•.¸¸.•*´¨`*•.
 |
| Umbrella City Rock Painting by Jerrika Morrell (Goose Creek Rocks) "My favorite materials are paint markers, the inexpensive acrylic paints from Wal-mart, the VERY fine paint brushes for detail, and a plastic paint palette for mixing paint." - Jerrika |
THE ROCKS
1-3" and 3 - 5" Rain Forest Rocks (The Community's Favorite)
Despite the pain it takes to acquire them, I highly recommend these rocks. If you can get them locally at a store they will run you about $13 a bag, about half the price it costs to order online. Unfortunately, there is only one place that I know of near Goose Creek that sells the Rain Forest River Rocks, which is the Home Depot Summerville.Available online at:
Home Depot
Sam's Club
Kmart
Walmart
Amazon
 1 -2 " or 3" - 5" Mexican Beach Pebbles
A nice, darker alternative to the white Rain Forest Rocks. These would be great in combination with bright acrylic paint colors or paint pens, which would absolutely "pop" on a dark surface.Available online at:
Sam's Club
Home Depot
Walmart
Amazon
"When a stone is cut and shaped, the final polish is achieved by either using some type of oxide polish or diamond paste, and the surface of the stone is pretty much sealed at this point. The only way you'll get any type of paint to stick to it is to use some very fine sandpaper and scuff the surface so the paint has something to stick to. If it's going to get used or put outside, a clear coat will help protect it, but it won't last forever."
Accidentally buy some polished rocks? Like Jerrika and Ed suggest, it is possible to build up the layers of paint, or sand them to give something for the paint to grip on to. Personally, I would try getting a little bottle of Gesso, which can coat the rocks and make them more agreeable with your medium. Acrylic white paint might work in a pinch. This also might be a great opportunity to use that Mod Podge, which could also act as a base for your polished rocks, if you'd like to keep its natural rock color intact. Just paint a layer, let it dry, then paint another. Then paint your design on. Gluing on some decorations would also be another good option (see more about that here.)
[Back to top]
Amazon
Polished Rocks (Why NOT to use them)
"In the beginning, when we had little knowledge of painting on rocks, we were buying shiny [polished] rocks and the paint wasn't staying on very well. On top of that, you had to do 3-4 coats just for the base. We discovered sanding the rock down is great but it's so much easier to just use matted [natural] rocks. A lot less hassle!" - Jerrika Morrell |
| These crop up at the Dollar Tree, but most of them are polished. |
Ed from Stones in Motion, an expert in the gemstone field, perfectly explains why Polished Rocks don't work well with paint:
"When a stone is cut and shaped, the final polish is achieved by either using some type of oxide polish or diamond paste, and the surface of the stone is pretty much sealed at this point. The only way you'll get any type of paint to stick to it is to use some very fine sandpaper and scuff the surface so the paint has something to stick to. If it's going to get used or put outside, a clear coat will help protect it, but it won't last forever."
Accidentally buy some polished rocks? Like Jerrika and Ed suggest, it is possible to build up the layers of paint, or sand them to give something for the paint to grip on to. Personally, I would try getting a little bottle of Gesso, which can coat the rocks and make them more agreeable with your medium. Acrylic white paint might work in a pinch. This also might be a great opportunity to use that Mod Podge, which could also act as a base for your polished rocks, if you'd like to keep its natural rock color intact. Just paint a layer, let it dry, then paint another. Then paint your design on. Gluing on some decorations would also be another good option (see more about that here.)
 |
| From Joann's, but unfortunately they're online only. |
Other Rocks
You can sometimes find small sacks of decorative rocks at craft stores and dollar stores. This may save you a little bit of headache and money if you just want a small bag of rocks fairly quickly. However, these rocks can be tricky because many of them come pre-polished, which means they won't take paint well. If you do happen to spy some of these at your next visit to the store, make sure they are "natural" and not "polished."[Back to top]
PAINTBRUSHES
 |
| Owl Rocks by Gina Witz (Port Angeles Rocks) |
buy another set for years.
[Back to top]