Thursday, August 30, 2012

Juju dolls!


Have you ever heard of a poppet? They are small, hand made dolls typically fashioned out of rags or even sticks and grass. These figures are sometimes intended to represent actual people and can contain personal items from that individual. They're used in folk magic, spell casting and effecting outcomes of the future. Sound familiar? Poppets are more (in)famously known by their other name, Voodoo Dolls.

I don't really like using the term voodoo doll because it has such negative connotations attached to it. When you think of Voodoo, it usually brings up visions of an evil witch doctor dressed as a crazy skeleton, ritualistically sticking pins into little crude dolls shaped like their enemies to cause them agony. Of course, this is an overblown stereotype made up by fantastical literature and Hollywood. The truth behind these misunderstood dolls is far less sinister.

Voodoo priestess from Hollywood...Brush YO TEETH!
I became initially interested in creating my own poppets after I realized that I was at a crossroads in my personal life.  Bad relationships, unnecessary stress and general illness have all been very disorienting recently. It's lead me to search for new, more positive answers to my problems. One way I like to "regain control" of my life is through meditation and forward thinking.

I am not a particularly religious person in the fact that I believe in one specific institution,  but I can say that I truly believe that we all have some sort of hidden magic will power inside that we can use to alter the environment around us. Have you ever wished for something so hard that it actually came true? Same idea. Poppets/Voodoo dolls have been used for centuries as focusing tools in this kind of magic, and they still serve their purpose as good today as they did 100 years ago.

I decided to divulge my mystical fantasies and make a few poppets of my own. They're inspired by a mix of traditional and contemporary voodoo doll styles and I adore their whimsical personalities. I created them with the thought in mind that each one was intended for a unique individual with specific needs in their life. These dolls can be used for focusing your energies on manifesting good fortune, healing, achieving goals, finding true love or improving certain aspects of yourself.
Don't make voodoo dolls that are
intended to harm or control others.

Before I go on, I have to reiterate that my poppets are not intended for evil use. Yes, they can be used in this way, but like attracts like and you will end up with just as much pain and suffering as your victim. You are also doing it wrong if you are trying to control a person's feelings or actions based off your own selfish needs (like, for example, casting a love spell on your crush so that they are forced to love you) because it's never OK to take away a person's free will... and these kind of deals always seem to back fire anyways.


Oh, and yes, each doll has an awesome back story to go with it.  
I'd like to think it helps to focus your energies!

Material girl

 Material Girl is a free spirited and care free. She probably likes to go to parties and meet new people, and is always up for an adventure. Those she meets are enchanted by her beauty, and good fortune follows her wherever she goes. This doll would be perfect for someone who wishes to be more outgoing, or even for someone who wants to attract this kind of person into their lives. 

She was the first poppet I attempted to make and is definitely one of my favorites. I decided to give her a beachy boho look after noticing her lovely tan and gold color scheme. Her shiny crystal eyes are actually made from some recycled earrings I found, and the clothing is made of ribbons. 

The hair is actually my favorite part of this doll. It's brown yarn that's been hand sewn into her head. This particular yarn turned out to be perfect for Material Girl's hair because it's very soft and wavy. A good way to "charge" this doll with your personal energy would be to maybe add some bows or beads to her hair, or perhaps give her some jewelry.


Mr. Banana Pants
This weird little fellow is definitely one of the "creative types." He constantly has crazy ideas for projects and is always working on artwork. Banana Pants is definitely not afraid to stand out for being colorful and different, in fact he embraces it! I would imagine BP is for someone who needs more creative spark in their life, or someone who wants to embrace the silliness and freedom that the world can provide them. 

I made Banana Pant's awesome yellow trunks out of ribbon and used some found objects for the belt. He has big golden bead eyes and a few tufts of embroidery thread hair. I believe that the awesome fabric print on his front is originally from Australia.. I obtained it in a bag of scraps given to me by one of my artist mentors who took a trip abroad. I think that extra element adds some culture to Mr. Banana Pants!


The Swamp thing
Not much is known about the Swamp Thing because this tiny bizarre poppet is a complete recluse. He never goes outside or does anything fun, and it would be your job to get him out of the house! Swamp Thing is smaller than the other voodoo dolls and could fit in your pocket so you could take him with you anywhere. He could help alleviate your own social anxieties and give you bravery by absorbing all of your negative energy.

I really dig Swamp Thing's crazy flowery print. I originally intended for this to be a female doll, but it instead turned out masculine or even androgynous at best...I enjoy the mystery. Swamp's eyes were made out of sequins. He also has a little tiny pink knot for a belly button, too cute.

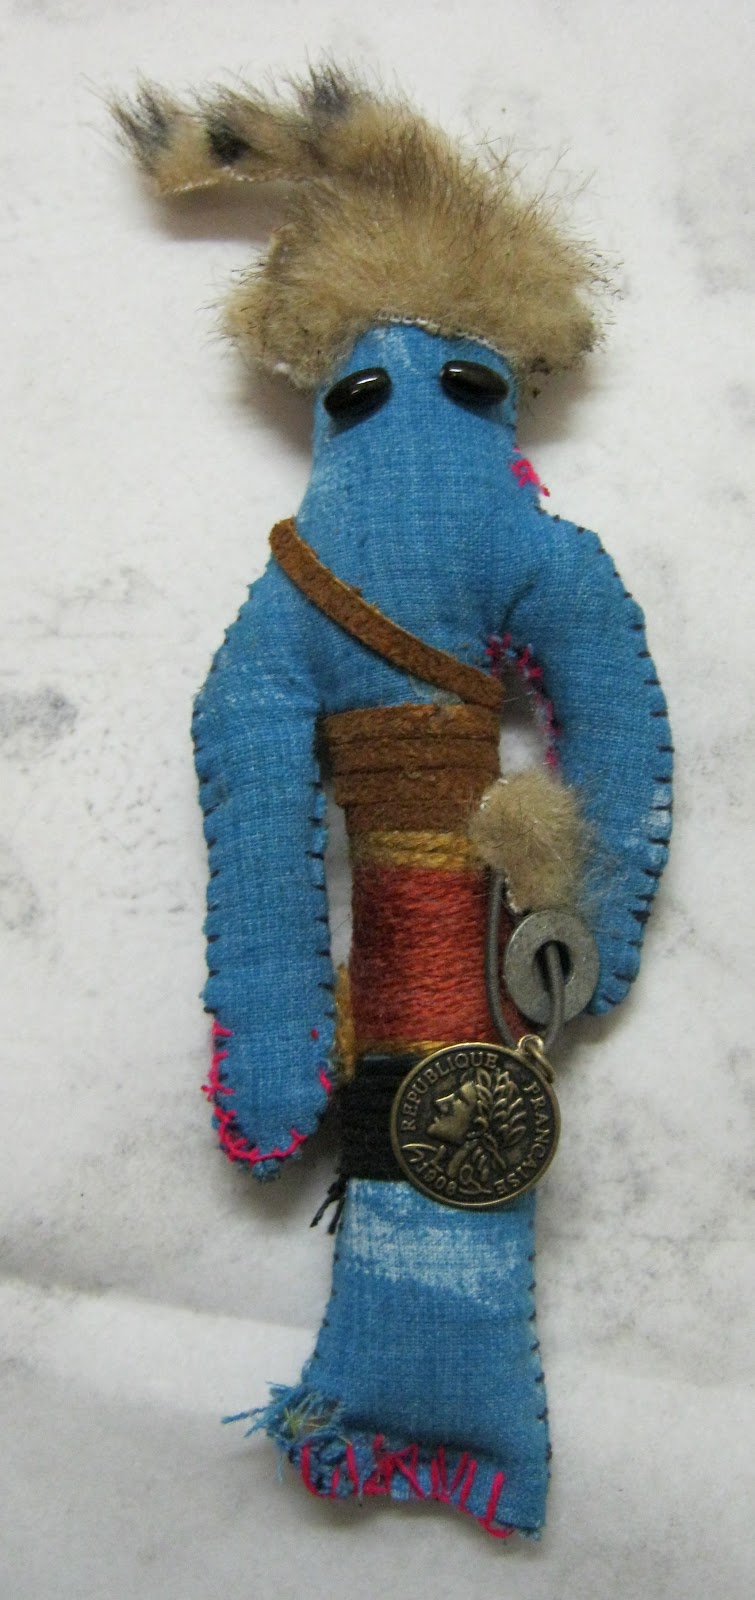

Daniel Crockett
I suspect that Daniel is a very supportive poppet to own. He is an explorer of the world ( if you couldn't already tell because of his awesome coonskin hat!) and is known to be incredibly lucky. The source of this luck comes from his collection of enchanted trinkets that he keeps on his belt at all times, which create good fortune when they clink together. Daniel is very manly but is known to have a sensitive side- perfect for a girl who wants this kind of guy in her life!

The hat was made of faux fur (and not an actual raccoon.) His eyes were made of beads and I love the kind of demure expression they give him. I used suede and various yarns for his outfit, and a few little found objects for his "good luck" trinkets.


I hope that these voodoo dolls speak to the people out there who are interested in getting some positivity back in their lives. If you're in a rut, depressed, or just want to see some results for goal you're perusing, why not try utilizing a juju doll during some meditation? Use it to help picture the things you want to be improved. It will be even more meaningful to add personal belongings to these dolls. They would benefit from a few extra stitches sewn, some extra trinkets and little patches. I also left them without all without a mouth so that their new owners can decide for themselves what kind of expression their poppet has, if any at all.

 I know it's all a little hokey, but the idea behind it is very sound- Clarity is a helpful thing to have in your life. You may be surprised by how quickly results can reveal themselves if you'd just take the time out of your day to think about what you actually want.


These dolls are currently available for sale on my Etsy page.


Saturday, July 14, 2012

How To Make a Bottle Cap Wind Chime

I am on a wind chime making frenzy! I just can't help myself. Something about found objects has been really inspiring to me lately. It all started with a crushed up beer can and some old shards of glass, but I couldn't stop there- I had to do more with this idea. I decided to experiment with some materials I saw show up very often when I scoured the internet for wind chime inspiration: bottle caps. I spied some great examples from various sources.....

This bottle cap wind chime by Pia Chaib
is so famous on Pinterest right now!
By Katrina Woerner

By Green Products
I definitely wanted to make one of these things, but I didn't want to leave my readers out of all the fun. So, I've decided to make this tutorial explaining how I created my own interpretation of the bottle cap wind chime. Let's get started, shall we?

Instead of throwing them away,  
mi amigos now drop their caps into
this re purposed coffee can.
Pretty crafty, eh?
 1. Collect your Bottle Caps

To make a moderately sized wind chime you will need to collect at least 40 to 50 caps. My wind chime ended up with over 70 caps in all. The exact amount will vary depending on how big you want your finished product to be. But heck, even if you run out of caps there are plenty of ways to improvise.

Personally, I happen to have a good connection when it comes to bottle caps supply- Many of my friends and family are beer enthusiasts that provide a steady stream of interesting caps.

It doesn't take long to collect enough bottle caps for your wind chime. I easy accumulated enough to fill the entire container within a month or so.


 2. Other Supplies You'll Need
 This is where you get to be creative. Exactly which additional materials you'll need depends on your personal taste and vision for your project. Gather up a variation of the following items:

  • Metal Wire- You need this to link your bottle caps together. I used a thick aluminum 10 gauged wire, but you can also use thin 24 gauge (or any other size of you like.) You can pick this stuff up at any craft store or even Wal-Mart. Some wind chimes utilized circular metal hoops, like the ones used in jewelry making, but I found that wire was a lot cheaper and simpler to work with. By the way, you will also need some pliers and wire cutters (or scissors.) Don't ruin your hands by trying to manually bend the wires! These tools will make your life easier, trust me.
  • Center Piece- This will be your base that you attach all your bottle cap links to. It just needs to be a sturdy and intriguing item. I encourage you to use a recycled found object! These random pieces of "junk" can end up being the perfect fit for your wind chime. Some great examples of center pieces include a vegetable steamer, An old CD, tree branch, tin cans, metal strainer, or like in my case, some salvaged gears from my old bicycle.
  • Piercing Tool- Something to put holes in your bottle caps. The best options I found were either a hammer and punch or an electric drill, but I'm sure there can be others methods that work as well.
 
2. Making the Holes
 Use a hammer and punch or a drill with a small bit, depending on your preference and availability. 


Drills are faster, but leave a jagged edge around your
cap's holes. Punches provide a much cleaner hole, but
require more effort, and can bend the bottle cap
if not pierced properly.

I'm going to assume that you already basically know how to use the hole punching tools, or know someone who does.

It's pretty simple- lay the bottle cap flat face down on a piece of scrap wood (NOT your mom's favorite table!) and drill or punch the hole in near the edge of the cap.
 
Protip: Don't drill or puncture your hand, that would suck! Remember to be careful with this step. Don't be afraid to ask for help (I know I did.)


3. Constructing the Chains
Once all your bottle caps have holes in them, it's time to make the chains. Take your wire and cut a moderately short length. How much wire exactly is up to you, depending on how long you'd like each chain link to be. For the record, my wires were cut probably around 2-1/2 inches long.

 In my opinion, it's easiest to just eyeball it and adjust the chain links until you find a length that's pleasing to you. After you find a good chain link size, go ahead and cut out a few extra wire pieces- you'll need them.


Hook the length of wire through the bottle cap's hole. Leave one end with a long "tail." You'll be using this extra wire to attach the second bottle cap.

Wrap the length of wire around itself.

Tightly secure the wrapped wire. Use pliers to press the loop closed so the bottle cap will not fall off.
One bottle cap hooked on. 
Now, repeat this process with the remaining length of wire and another bottle cap.
Wrap...
Secure....
One bottle cap chain link complete!
Continue attaching the links together until you've reached
the desired length of your wind chime. I ended up using
six or seven bottle caps for each chain.


4. Attaching the Chains & Center Piece
This step may vary a little depending on what you used as your center piece. You will have to find a way to hook the centerpiece and the chains together with the wire. In some cases, like this particular project, it's fairly easy to wrap the wire around the base. Unlike my last wind chime project, where I had to drill holes into my center piece in order to attach the chains.


To hang my wind chime I made a weaving out of fishing wire around the bike gear and tied it off at the end. Simple, quick and effective. A piece of fishing line or regular wire would work, too.
All of the chains finally attached to the center piece.  My wind chime is now complete!
5. The Finished Product

The metal disks I used on the bottom of my wind chime are from cans of dough. I love the rusty patina they're developing after being exposed to the outdoors. A few random found object additions to your bottle cap wind chime can really create a nice embellishment. Plus, your bottle caps will make more sounds when they bump up against these items.

 If you want your wind chime to look "fuller,"
you could easily add more bottle cap chains
down the middle to make it look more dense.
Personally, I chose to only add chains to the
outside of my center piece, but I may go
back and add additional chains one day soon.


Serving up bottle cap realness.
If you end up using this tutorial for help, I wanna see your finished wind chimes! And as always, if you have any questions at all about this subject, by all means leave me a comment.

Saturday, June 23, 2012

The Outsiders Show

Look familiar? It's my "Horny Deer" painting I did for this tutorial.


Earlier this month I was featured in a local underground art show called The Outsiders! It was a wonderful little art fest that lasted a week and included a different event every day. I love shows like this- the variety of artistry and talent really brings the entire creative community together. It mainly focused on getting exposure to up-and-coming artists (AKA "Outsiders") as opposed to seasoned art show veterans. Anyone who was brave enough to submit pieces was allowed to show their work- this brought a lot of fresh faces out of the wood work for their first ever art showing. There was also a number of live performances from bands of a variety of different styles, with everything from a David Bowie cover band to Middle Eastern flute playing.

It was a great lineup that proved to be a very unique artistic experience. My favorite event by far was opening night, where everyone was given the opportunity to take up paintbrushes for a massively interactive painting fest. Dozens of wooden palettes and doors were available for anyone to make their mark on. The energy was very cool and inspiring- there were tons of creative minds all working together on a single task at once.

Me amongst the crowd painting my little corner while a live band played in the background. Not one of my most glamorous looks (it was very hot in the building) but I was happy to contribute to this awesome interactive artwork anyways.

All the best local artists came out to paint that night, including my friend Erin and my cousin Ederick. I loved seeing all the different styles that people painted in.
Speaking of interesting styles, there was a lot of really intriguing work in "The Outsiders." I was amazed by the amount of talent that had previously been undiscovered. Here's some of my favorite pieces I spied during the show. By the way, all the photography was either taken by Eye Ball Art or Katherine Wooton. Thanks for getting some really getting nice shots of the art!

The works submitted by Steve Delong were especially fascinating because I could never figure out exactly what medium they were. Apparently, this effect was achieved by changing the color of metal with chemical solutions. Pictures can't really show how beautiful and shiny this piece is in real life. Never seen anything like it before!


Nina Rego made these gorgeous paper maiche figures. I would really love to pick this artist's brain, she seems like quite the character. About this piece, she said: "Hunger in Darfur never looked so colorful."

It's an artwork by me that this blog has never seen before! It's a modernized copy of Ralph Steadman's "Aspen Nights" I did for an assignment in school.

One of the walls with all the artwork hung on it.
I see you,  Skeleton Man! He eerily stares at viewers from behind band equipment. I submitted 6 artworks to the show in total, including a few familiar faces.

I love birds, especially when they're made completely out of buttons.
Another sculpture by the same artist, Crystal King. This was the first time her work was ever seen in a gallery, and she had some of the most engaging pieces in the show.

Check out this incredible hand made clock by Dan Diehl! It is constructed completely out of wood, except for a small motor that winds the clock, and it's 100% functional. Very old school.. just imagine how precisely the gears have to be cut out in order for everything to work right.
I wish I knew the whole story behind this wicked neon lights shark. I suspect it's made out of recycled materials? All I know for sure is that the artist's name is Eric ElectricDirt...(Cool name, man)
Since we're on the subject of recycled materials, I definitely should mention this series of odd skeletal figurines by Tony Prete. As the story goes,  he was instructed by his employers to take some lead to a landfill, but instead he melted it down to make these eerie sculptures. I am told that the glass enclosures were also rescued from being thrown away. This guy has great taste when it comes to "trash!"
One of my favorite artworks I've ever done, and I haven't even really documented it on this blog yet. You will hear more about this piece one day soon, I promise!
Above is work by the very popular Tim Showers, who is a regular in the Charleston art circuit. He shares a wall with a very shy artist who is showing her artwork to the world for the first time. I think that this is symbolic of "The Outsiders" show's ability to bring a colorful variety of people together for the simple purpose of celebrating art.
Phil Hyman in his natural habitat- spray paint and intricate stenciling work.
Lastly, I have to mention that all of this was organized by this awesome artist and curator named Phil Hyman. He does almost all the cool shows in the Charleston area. If you're in the historical downtown district of South Carolina and see a quirky collection of local bohemian art, chances are it was because this guy made it happen. I am grateful for people like him because it isn't an easy thing to run an art show, despite the fact that they're completely vital to keeping the art community alive around here. I just wanted to shout Phil out to let him know that his dedication to bringing art to the masses really does make a difference in many artist's lives. Thanks man, it was an awesome experience.  (And make sure to like him on Facebook!)


UPDATE: I've participated in another show by Phil! Check out the new art here.